Build your website using Publish
Publish is a static site generator built specifically for Swift developers. It enables entire websites to be built using Swift, and supports themes, plugins and tons of other powerful customization options.
It's an open-source framework developed by John Sundell and powers his website
Publish relies on Plot and Ink to make the experience as Swift-y as possible. The former is a domain-specific language (DSL) for writing type-safe HTML, XML and RSS in Swift, whereas the latter is a markdown parser that enabled creating new posts (like this one) by simply adding a markdown file in the correct folder.
Getting Started
The fastest way to work with publish is by using its command-line tool (CLI). To install the CLI clone the repo, navigate inside of it and run make.
$ git clone https://github.com/JohnSundell/Publish.git
$ cd Publish
$ make
Now, just create an empty folder for your website somewhere on your computer, navigate to that empty folder and run Publish new.
$ mkdir MyWebsite
$ cd MyWebsite
$ publish new
Finally, run open Package.swift to open up the project in Xcode to start building your new website.
Project Structure
When you open your project for the first time, you will have a structure similar to this:
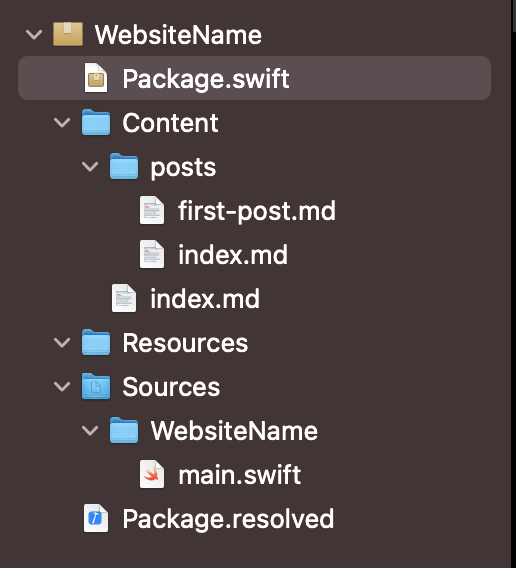
When you run your project for the first time, a folder named Output will be created. Inside of that folder you can find the files of the static website.
- The project is built using Swift Package Manager and
Package.swiftcontains the basic structure to includePublishin the project. - Content is the folder where the
.mdfiles go. Each folder name should match aSectionIDin your website (more on that later). - Resources is where the images,
CSSfiles and things of that nature would go. main.swiftis the main file where the root code of the website exists. There you can customize the skeleton of your website.
Publish uses a theme when creating the website. This helps with keeping everything neat and aligned. By default, Publish ships with a default theme named .foundation this is the theme John uses for his website.
Deeper look at Main.swift
The default structure of main.swift is the following.
// This type acts as the configuration for your website.
struct MyWebsite: Website {
  enum SectionID: String, WebsiteSectionID {
  // Add the sections that you want your website to contain here:
    case posts
  }

  struct ItemMetadata: WebsiteItemMetadata {
  // Add any site-specific metadata that you want to use here.
  }

  // Update these properties to configure your website:
  var url = URL(string: "https://your-website-url.com")!
  var name = "MyWebsite"
  var description = "A description of MyWebsite"
  var language: Language { .english }
  var imagePath: Path? { nil }
}

// This will generate your website using the built-in Foundation theme:
try MyWebsite().publish(withTheme: .foundation)
-
Each
SectionIDwill generate a section in the website. The raw value of theSectionIDcase corresponds to the path value of that section in theURL. -
ItemMetadatais a list of custom metadata to include and parse in.mdfiles. -
nameis the title to display when the websiteURLis shared, or in the tab bar or the web browser. Articles will automatically have the title of the article in addition to the name set here. -
descriptionis the description displayed when theURLis shared. -
languagewill automatically set thelang =in thehtmltag. -
imagePathis the image associated with the shared link of the website. -
try MyWebsite().publish(withTheme: .foundation)will generate your website using the built-in Foundation theme. the.publishfunction takes in more customization parameters for more flexibility.
Creating a custom theme
Foundation is ok. However, you'd would want your website to have its own feel and look. That's where creating your own theme comes into place.
A theme requires two parameters to be created: an htmlFactory and a resourcePath. The latter is self explanatory. It basically requires an array of strings pointing to the relative paths of the resources to include (CSS files).
The htmlFactory on the other hand is slightly more complicated. It should be an instance of an object (ideally a Struct) that conforms to HtmlFactory and implements the needed methods.
-
func makeIndexHTML(index: Index, context: PublishingContext<TheInkedEngineerWebsite>) throws -> HTMLis required and should compose the code to generate theHTMLcode for the home page. -
func makeSectionHTML(section: Section<TheInkedEngineerWebsite>, context: PublishingContext<TheInkedEngineerWebsite>) throws -> HTMLis required and should compose the code to generate theHTMLcode for each section in the website. A section is created by adding acaseunderSectionIDinmain.swift. -
func makeItemHTML(item: Item<TheInkedEngineerWebsite>, context: PublishingContext<TheInkedEngineerWebsite>) throws -> HTMLis required and should compose the code to generate theHTMLcode for each item (article) in the website. An item is created by adding a.mdfile inside a folder named as the raw value of a section. -
func makePageHTML(page: Page, context: PublishingContext<TheInkedEngineerWebsite>) throws -> HTMLis required and should compose the code to generate theHTMLof any free-form page that does not follow the traditional structure. A page is added by creating a.mdfile inside the Content folder.
Once the htmlFactory is created, we generate our theme like so:
static var myTheme: Theme {
  Theme(
    htmlFactory: CustomHTMLFactory(),
    resourcePaths: ["Resources/css/styles.css", "Resources/css/articles.css"]
  )
}
To use the theme, got to main.swift and modify the .publish method passing your newly created theme instead of .foundation.
Tips and Tricks
-
Use SplashPublishPlugin to provide correct
Swiftsyntax parsing in your.mdcode blocks. -
Below is a helper to open links in a new tab:
/// Add an `<a>` HTML element within the current context.
/// Add `target="_blank"` and `rel="noopener` by default.
/// - parameter nodes: The element's attributes and child elements.
static func externalLink(_ nodes: Node<HTML.AnchorContext>...) -> Self {
  var nodes = nodes
  nodes.append(.target(.blank))
  nodes.append(.rel(.noopener))
  return .element(named: "a", nodes: nodes)
}
- Use an
enumto list all yourCSSclasses. It will reduce the possibility of a typo. If you do so, the code snippet below will come in handy:
extension Node where Context: HTMLContext {
/// Adds the raw values of the passed elements as classes.
  static func `classes`(_ classes: String...) -> Self {
    .class(classes.joined(separator: " "))
  }
}
so now, you can add your classes like so: .classes(CSS.underline, CSS.underlineThin, CSS.socialLink)